This article gives a very quick overview of how to use Brivvio.
For a full guide, we recommend taking out 7 Lessons Brivvio Intro Course.
Brivvio in 3 steps..
The 3 steps to use the Brivvio app are:
- Record or import a video (CAPTURE/IMPORT)
- Playback, adjust branding and add captions (REVIEW/EDIT)
- Save, export or share your video (EXPORT/SHARE)
Let's look at those in a bit more detail...
1. Record or import a video (CAPTURE/IMPORT)
When you open the Brivvio app, it will open to the Brivvio 'camera view'.
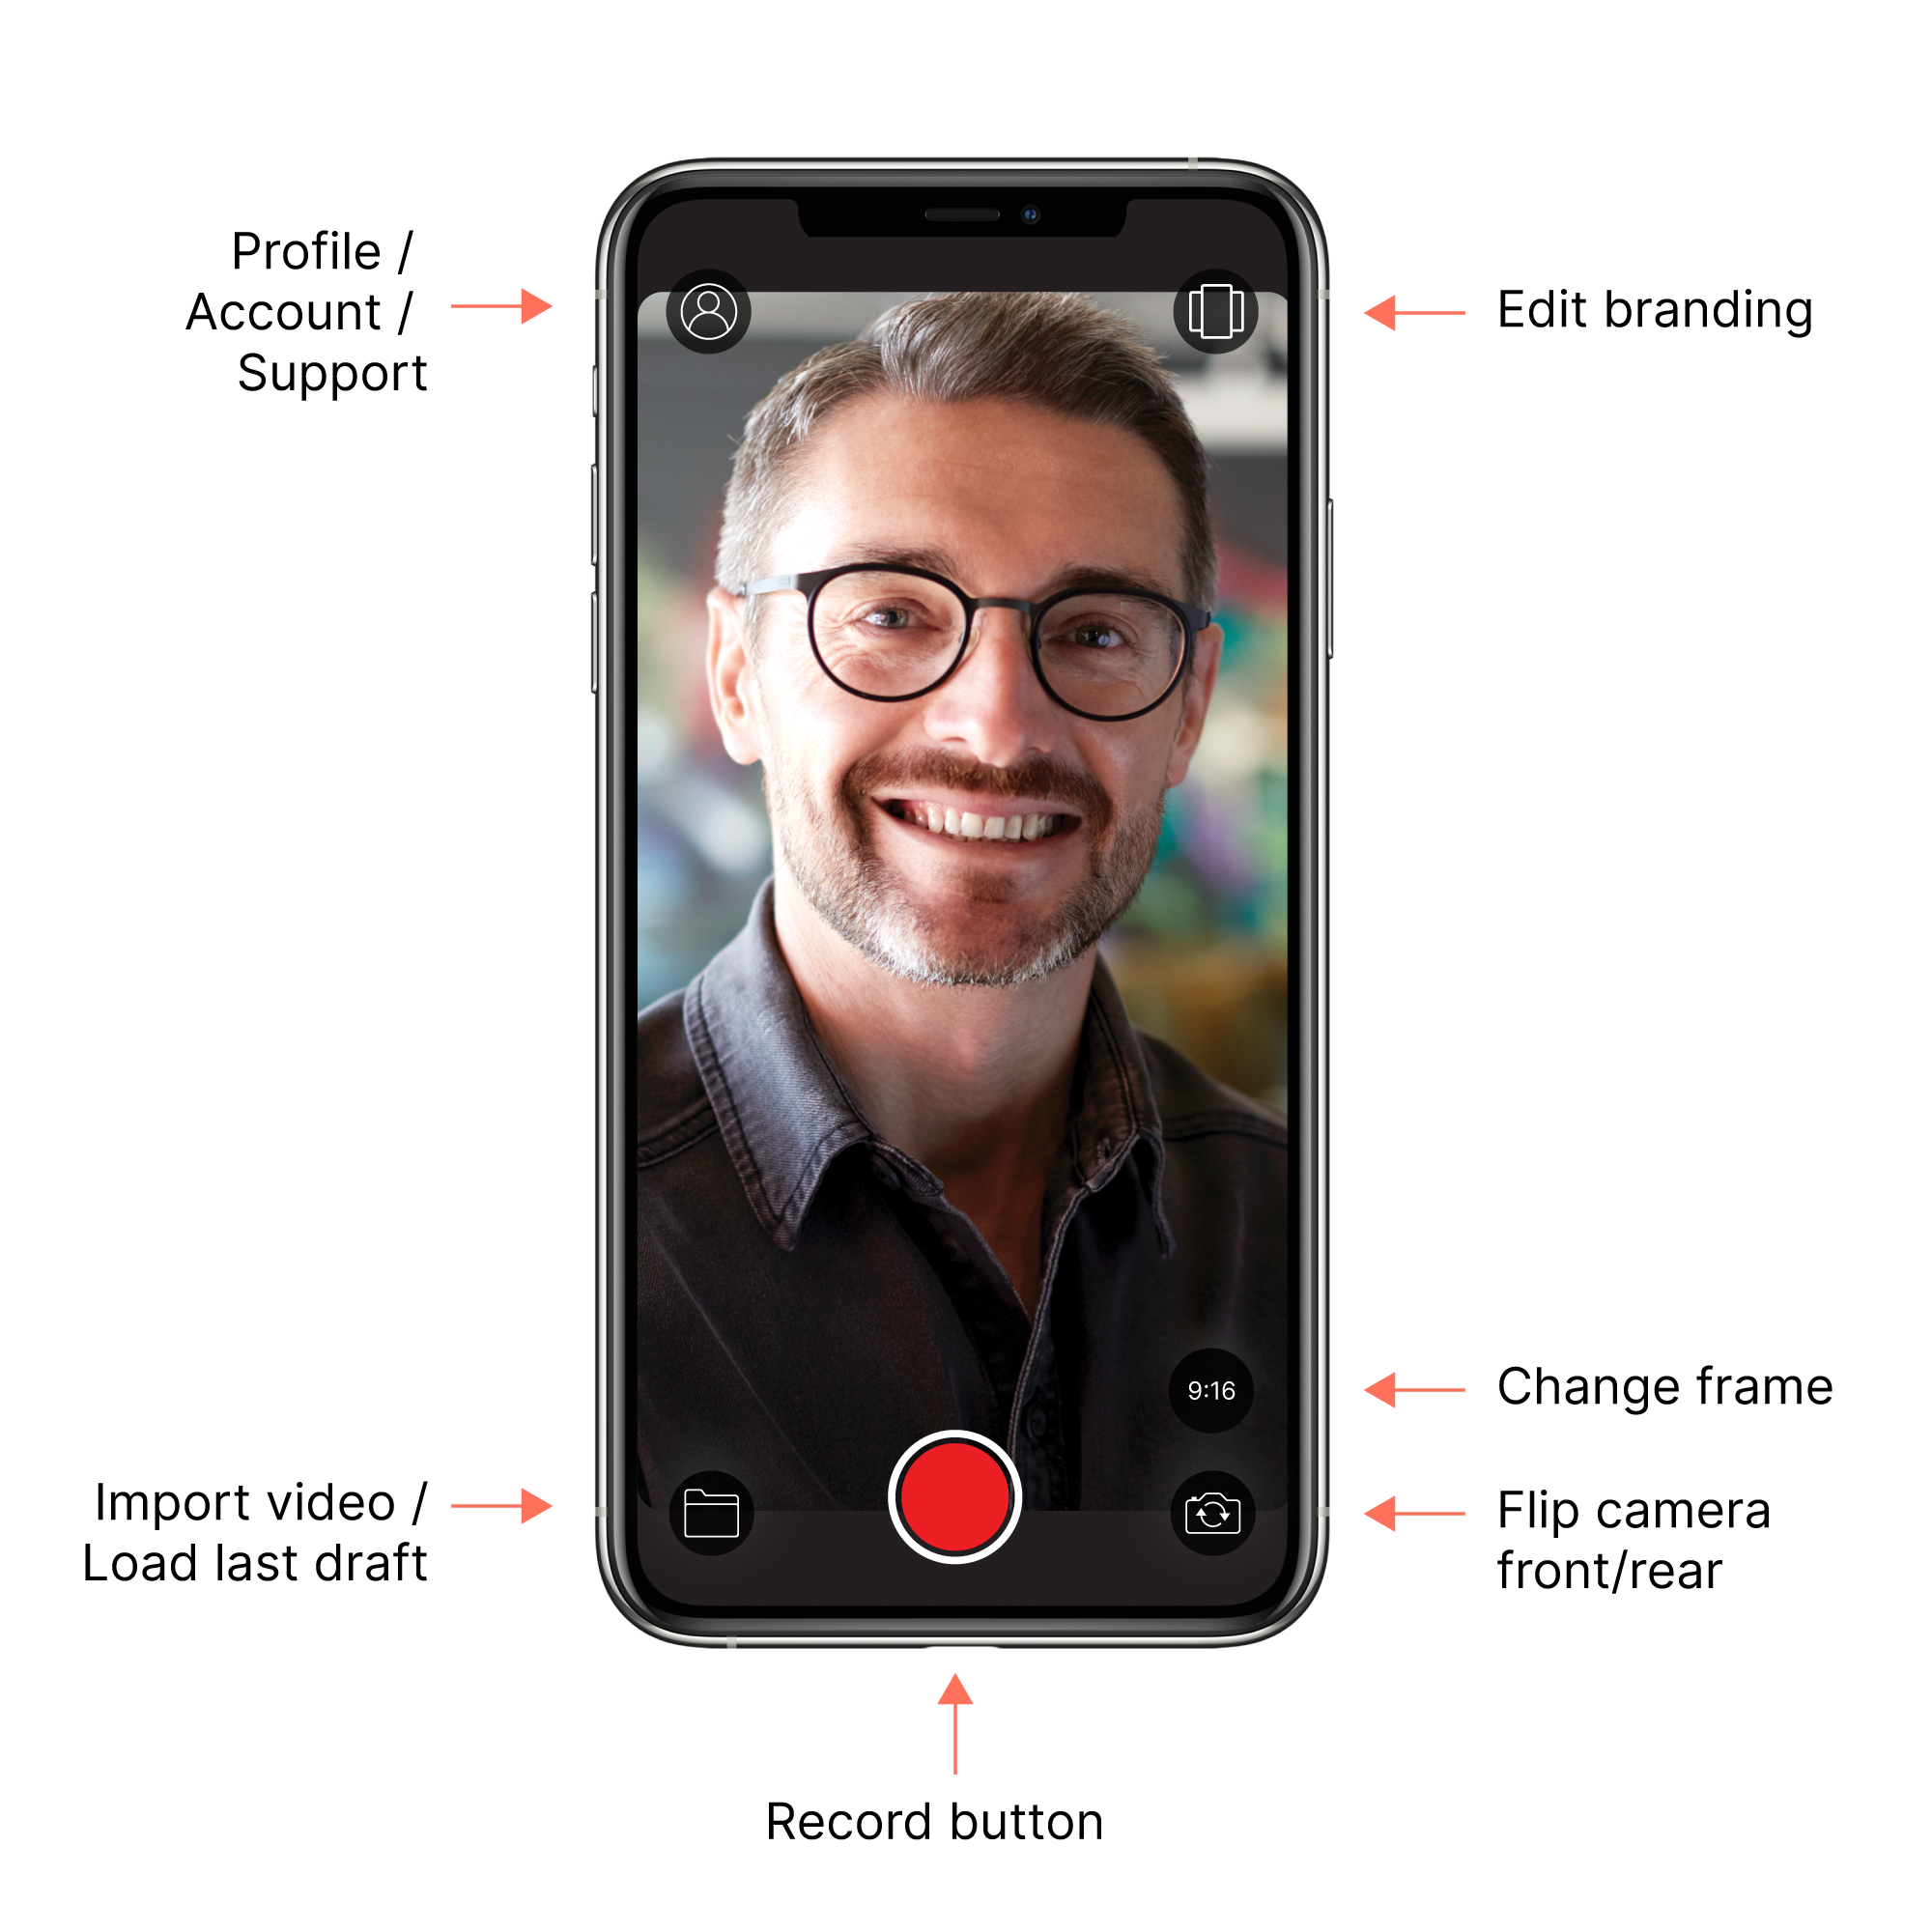
In the Brivvio 'camera-view' you can:
- Record or import a video
- Edit your current branding preset
- Change the frame
- Switch between front and rear cameras
- Access your Brivvio profile/account
Before you record, you can choose whether to capture using the front or rear cameras of your device (if your device has both). Tap the 'camera flip' icon in the bottom right corner of the Brivvio camera view to toggle between front and rear cameras.
To record a video in the Brivvio app:
- Hold your device in the desired format (horizontal or vertical).
- Make sure what you want to record is neatly inside the camera frame.
- Hold steady (or use a tripod) and tap the red circular 'Record' button.
- Tap the red square 'stop' button when you want to stop recording.
Tip: While recording, the red circular button will change to a square. A timer will indicate how long you have been recording for at the top of the view.
To import a video into the Brivvio app:
- In the Brivvio camera view, tap the folder icon in the bottom left corner.
- To import a video from your device's Photo Gallery, tap the 'Pick from Photos' link.
- To import a video from your device's files, or a connected cloud file services (like Dropbox or Google drive) tap the 'Pick from Files' link.
- If you have previously recorded or imported a video, a third link 'Use latest draft' will be visible. Tapping this link will reload you most recently imported or recorded video.
You can import videos of any size and format. Brivvio will automatically recognise the size and format of your video (for example: landscape, square or vertical)
Tip: Brivvio currently stores only your most recently captured of imported video. So each time you record or import a video, your previously stored video will be replaced by the new video.
2. Playback, adjust branding and add captions (REVIEW/EDIT)
After recording or importing a video, Brivvio will enter 'review-mode' and automatically apply your branding preset to your video. In 'review-mode' you can adjust and review your video before saving and sharing it.
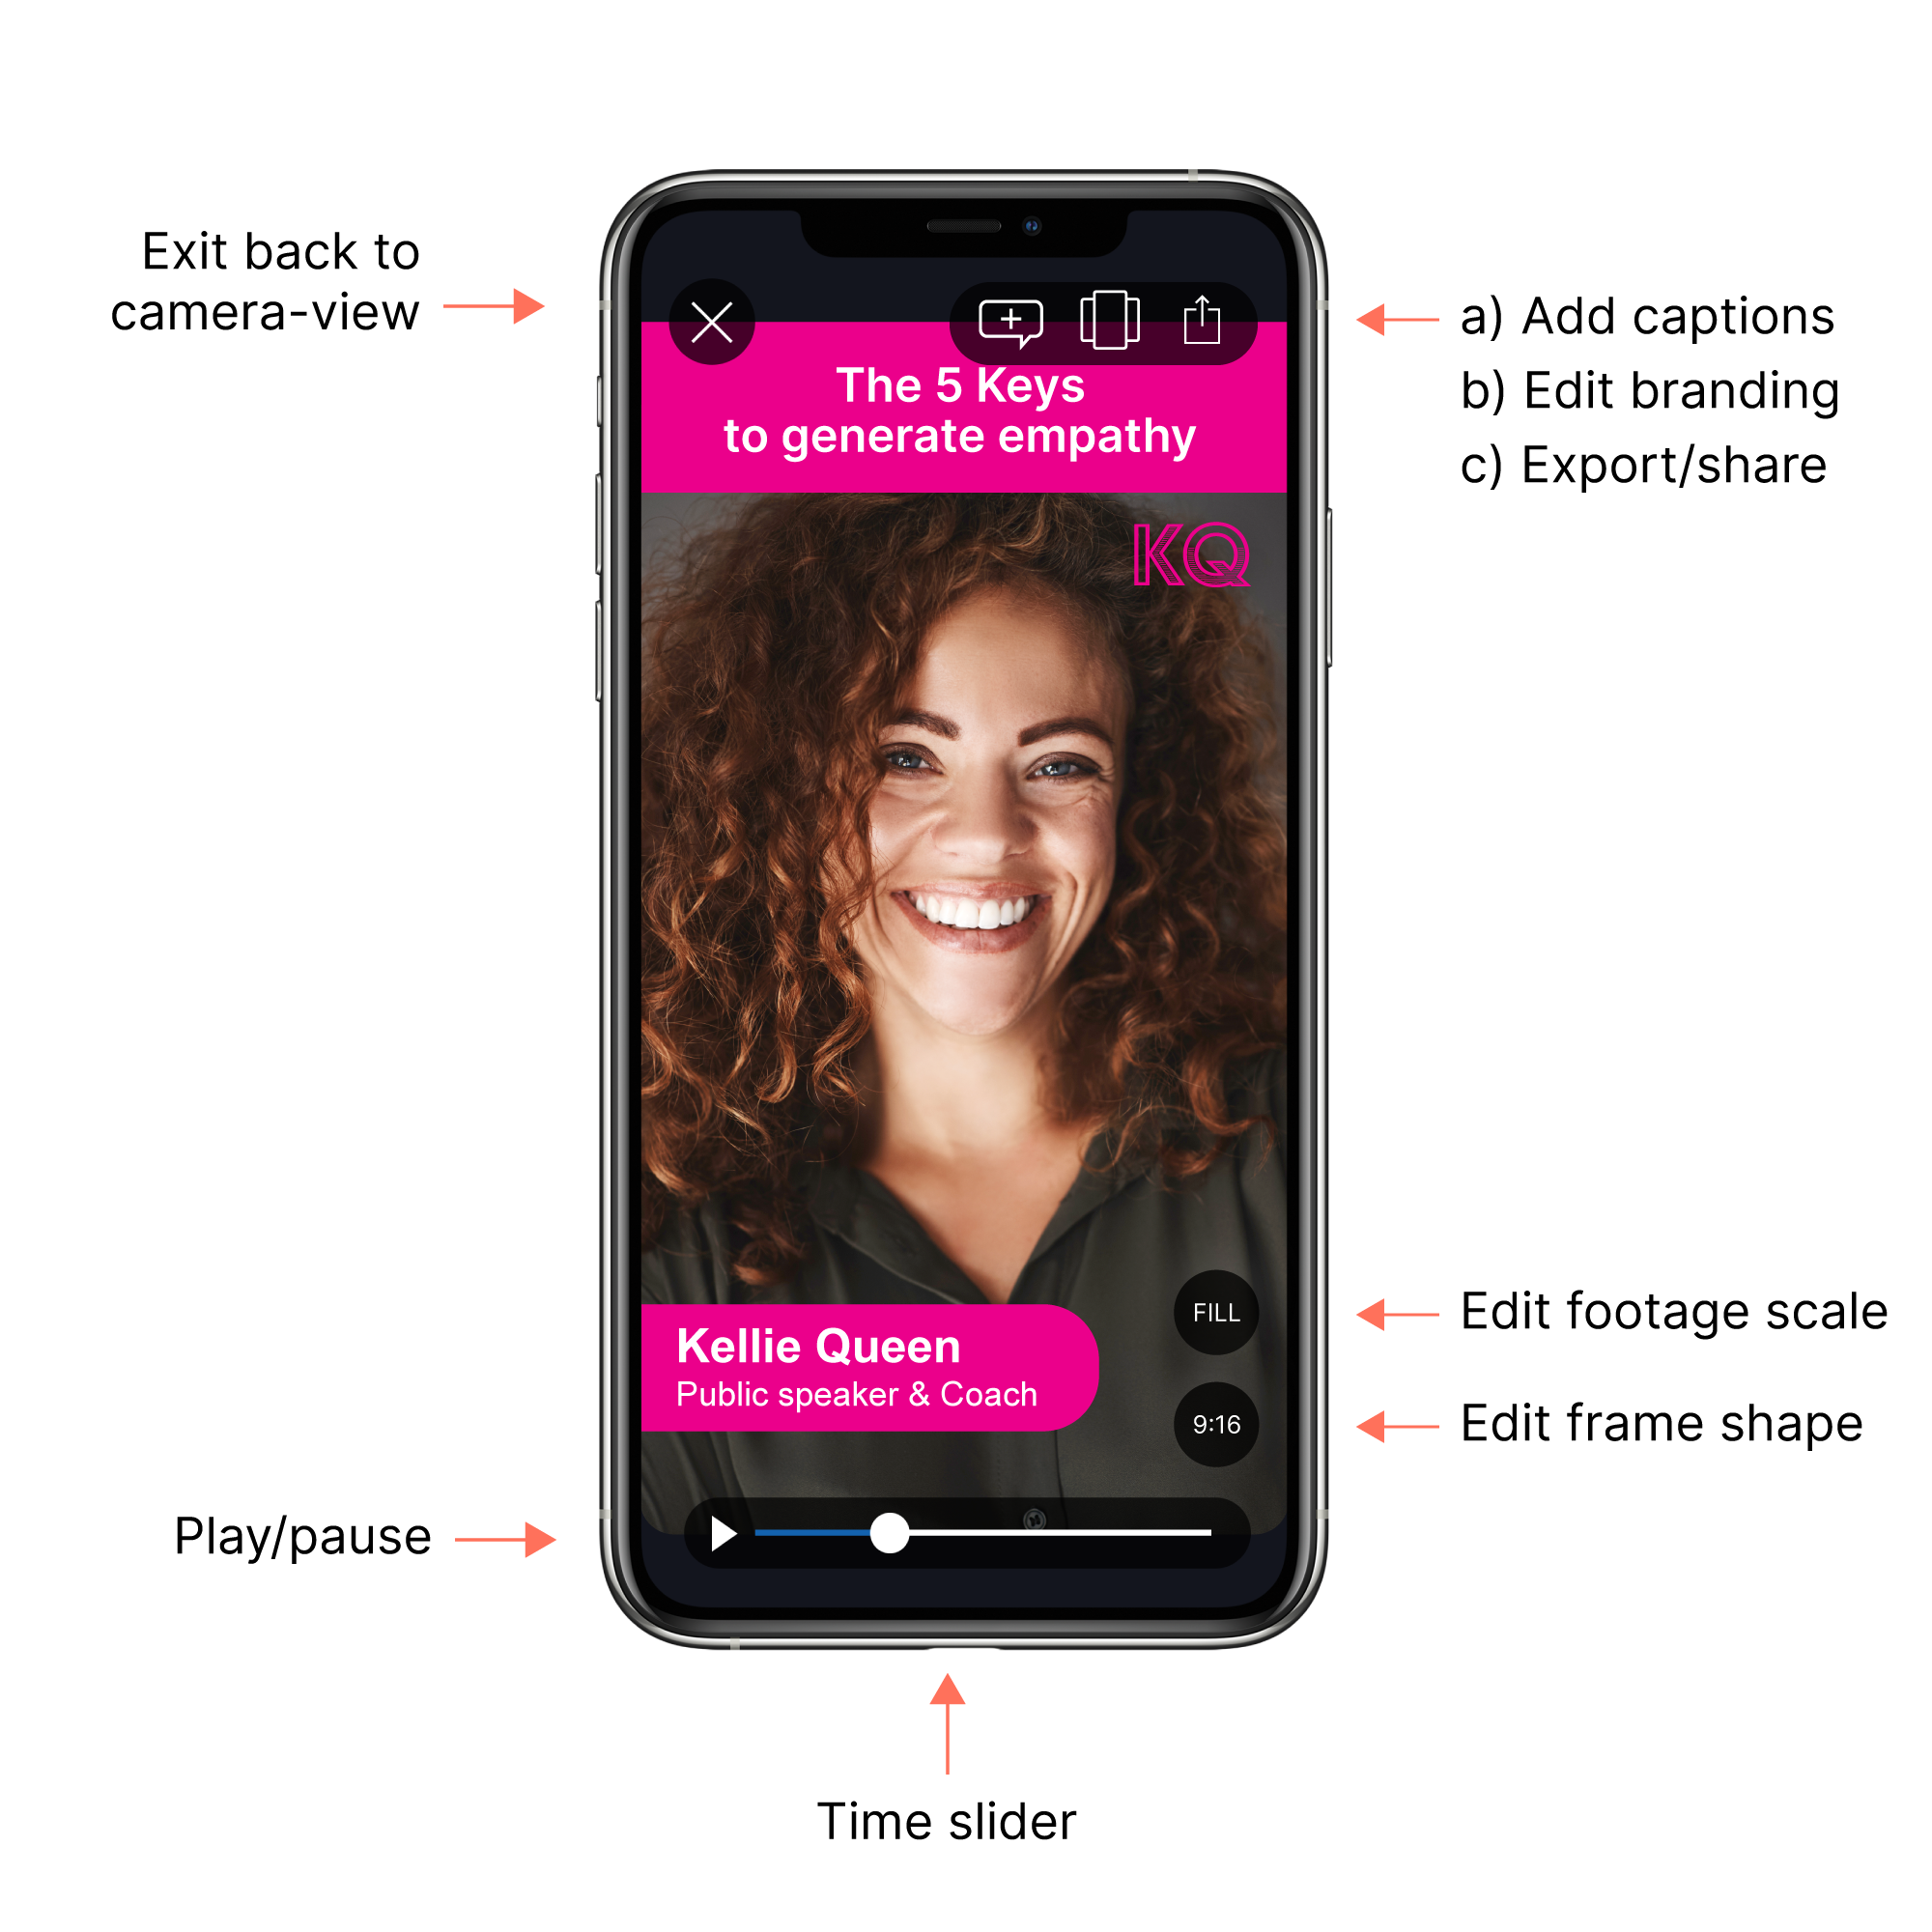
In the Brivvio 'review-mode' you can:
- Change the format of your video
- Adjust your branding preset
- Apply automatically generated captions to your video
- Playback, pause and scrub through your video, with branding and captions applied
- Save, export or share your video
- Exit back to the Brivvio 'camera-mode'
To playback your video, tap the triangular 'play' icon in the bottom left corner. While playing the triangular 'play' icon this will change into a 'pause' button. Tapping the 'pause' button will stop playback. You can tap and drag the circular dot on the time-line to scrub back and forward to any point in your video.
To learn how to change the format of your video, read this article.
To learn how to adjust your video branding, read this article.
To learn how to add automatically generated captions, read this article.
3. Save, export or share your video (EXPORT/SHARE)
When you are happy with your video, branding and captions, and ready to share it, tap the 'share' icon in the top right corner. This icon looks like a small square with an up-arrow pointing out of it.
When you tap the 'share' icon, Brivvio will 'bake' your video and prepare it for export. A popup will appear with a progress bar. This usually takes about 25 seconds for every minute of video. Actual time will depends on the processing speed of your device model. Newer devices are faster.
When 'baking' has completed you will be presented with a panel that gives you a range of options for saving, exporting and sharing your video. Some of the options will depend on what other applications you have installed on your divide, and how they are configured.
For example, you might see options to share via 'Airdop', 'Save video', Save to Files', 'Save to Dropbox', send via SMS or share using social-media and messaging apps. You can edit which options you see here.
For more more details on exporting and sharing your video, read this article.
Finishing with your video and recording/importing a new video
When you're finished in 'review-mode' or if you wish to record or import a new video, tap the 'X' icon in the top left corner. A popup will ask you to confirm this action.
When you exit 'review-mode' and go back to the 'camera-view' your current video will be stored in Brivvio and can be reloaded by tapping the 'folder' icon in the bottom left corner and then tapping 'Restore last draft'.
Take the 7 Lesson Intro Course
Now that you've got the overview, Start your 7 Day Free Trial and then take out 7 Lessons Brivvio Intro Course.
Click here to start the 7 Lessons Brivvio Intro Course.